
Gallagher MBS800 Multi Powered Energizer
Designed for mains, battery or solar installations.
No matter what your power source or location, the Gallagher MBS Energizer range provides a high performing and convenient animal control solution.
Easily set up portable or permanent installations in any location. Once installed, the LED bar graph on the energizer indicates fence voltage performance.
Gallagher MBS800 Multi Powered Energizer User Guide (2.8 MB) – PDF


Overview & RESOURCES
User Guide Download Information
Gallagher MBS800 Multi Powered Energizer User Guide (2.8 MB) – PDF
Any power source. Anywhere.
Designed for mains, battery or solar installations. No matter what your power source or location, the Gallagher MBS Energizer range provides a superior and convenient animal control solution.
Watch this video to see how you can install a Gallagher MBS Energizer with our easy to use Solar Kit.
Overview
| 8 Joules |
10 km
|
||
|
6 Joules
|
40 km
|
||
| Yes |
Mains, Battery, Solar
|
||
| 4.9W | Warranty |
3 Year
|
|
| 253mm | 135mm | ||
| 2.6kg |
273mm
|
Use any power source
Designed for mains, battery or solar installations up to 10kilometres or 80 acres
Superior performance in all operating modes
Reliable fence voltage irrespective of your power source
View fence performance at a glance
LED bar graph indicates fence voltage performance
Check battery health in an instant
LED bar graph indicates your battery status
Use in the harshest of farming conditions
Portable, water-resistant case, with built-in lightning protection
Fast, flexible installation
Easily set up portable or permanent installations in any location
All leadsets included
Mains, battery and fence leadsets are all included with the Energizer. Gallagher solar kit sold separately.
Protect your battery
Smart battery management algorithm protects the battery from being over-discharged and permanently damaged


BATTERY INFORMATION
Use 12V deep cycle lead acid batteries. Batteries of the same type and manufacture can be connected in parallel to increase capacity.
Switch energizer OFF. Disconnect energizer from the battery. Replace with fully charged battery for best performance.
Batteries must be in a well ventilated area while charging. Charge batteries before storage.
Store batteries in a dry place between 0 deg C and 30 deg C. Do not leave batteries below 50% charge (12 V) for a prolonged period of time.
All lead acid batteries must be disposed of safely according to local regulations. Use suitable protective clothing and containers for any leaking batteries.
INSTALLATION
Mount the energizer on a post or wall, out of reach of children. Install in a place where there is no risk of the energizer incurring mechanical damage, and where there is no risk of the leads being chewed by animals. If possible, install away from heavy electrical equipment e.g. pumps or other items that may cause electrical interference.
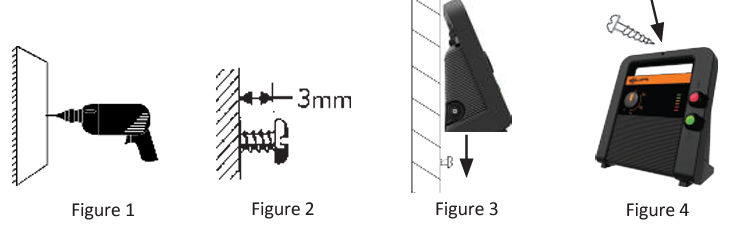
Permanent Installation
a) Drill a single hole using a 4mm (5/32”) diameter drill for timber walls, or a suitable wall plug for brick and concrete walls (Figure 1).
b) Fix the 32mm screw provided into the wall leaving the head of the screw 3mm (1/8”) out from the wall (Figure 2).
c) Place the energizer over and slide down onto the mounting screw (Figure 3).
d) Secure energizer by fixing the 50mm screw into the wall through the hole in the handle (Figure 4).
Permanent Fence
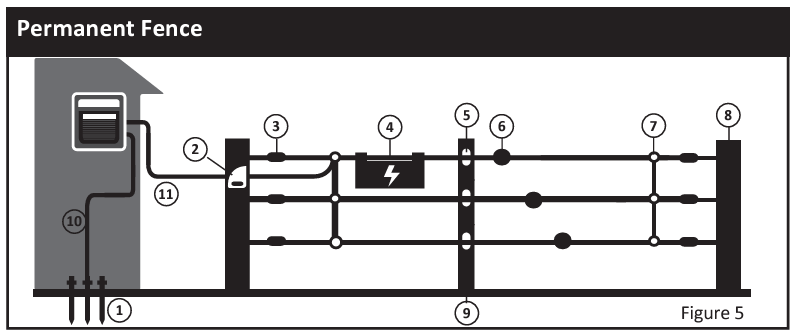
| 1. Ground rods | 4. Warning sign | 7. Joint clamps | 10. Earth Leadout (Green) |
| 2. Cut out switch | 5. Post insulator | 8. Strain post | 11. Live Leadout (Red) |
| 3. Strain insulator | 6. Wire tightener | 9. Line post |
Mount the energizer on a post, (Figure 6) or alternatively, hang the energizer directly onto a fence using the built-in wire hooks.

| 1. Ground rod | 4. Reel | 7. Insul-grip |
| 2. Earth (Green) | 5. Polywire/Turbo wire | 8. Leadset/Battery |
| 3. Live (Red) | 6. Tread in Post | 9. Post |
Mount Energizer to the Gallagher solar bracket in a place where there is no risk of mechanical damage (complete installation instructions come with the Solar Bracket Kitset G49521 and G49541).

| 1. Solar panel | 3. Battery | 5. Fence | 7. Bracket |
| 2. Regulator | 4. Energizer | 6. Earth stake |
CAUTION: Do not install energizer on the ground. Never leave the energizer face down.
The energizer can be installed with solar panels and batteries as part of a solar installation (refer to Solar Kit instructions for full installation details).
Permanent Installation
Connect the red and green energizer terminals to the fence and earth stake using lead-out cable. Attach lead-out cable to the fence using a joint clamp (Figure 5).
Portable Installation
Using the leadsets provided: a) Connect energizer earth (green) terminal to the earth stake installed at least 3 ft (1 m) into the ground (Figure 7). b) Connect energizer fence (red) terminal to the fence

• Ensure energizer switch is set to OFF before connecting power.
• Ensure the fence is ready to operate.
Battery
Using the supplied battery leadset:
a) Red Insert battery leadset into the power socket of the energizer.
b) Connect red lead to the (+) terminal of the battery,
c) Connect black lead to the (-) terminal of the battery.
Important: ONLY use a 12 V deep cycle lead acid rechargeable battery.
Mains Power
Connect energizer to mains power using the supplied mains power adaptor.
CAUTION: Energizer must be installed under cover when connected to mains power.

Solar
The energizer can be installed with solar panels and batteries as part of a solar installation (refer to Solar Kit instructions for full installation details).
Looking to get a Gallagher MBS800 Multi Powered Energizer 4Tags might be able to help! Click HERE to find out more.